Streaming Sensor Data in Real-Time with Azure IoT Hub
/Note: If you are just unpacking your Raspberry Pi, check out how to get up and running via a headless setup (no external keyboard or mouse required).
This post builds upon my previous demo, How to Build a Raspberry Pi Temperature Sensor. I will show how to extend the project to send temperature data into the cloud via Azure IoT Hub, then consume the incoming events to be visualised in real-time using Stream Analytics and Power BI.
Prerequisites
- Completed: How to Build a Raspberry Pi Temperature Sensor
- An Azure subscription
- An IoT Hub (Tip: Choose the Free Tier which allows 8,000 messages per day)
- A Stream Analytics resource
- A Power BI account
1. Register an IoT Device
- Navigate to IoT Devices within your IoT Hub.
- Click Add.
- Populate the Device ID (e.g. raspberrypi).
- Click Save.
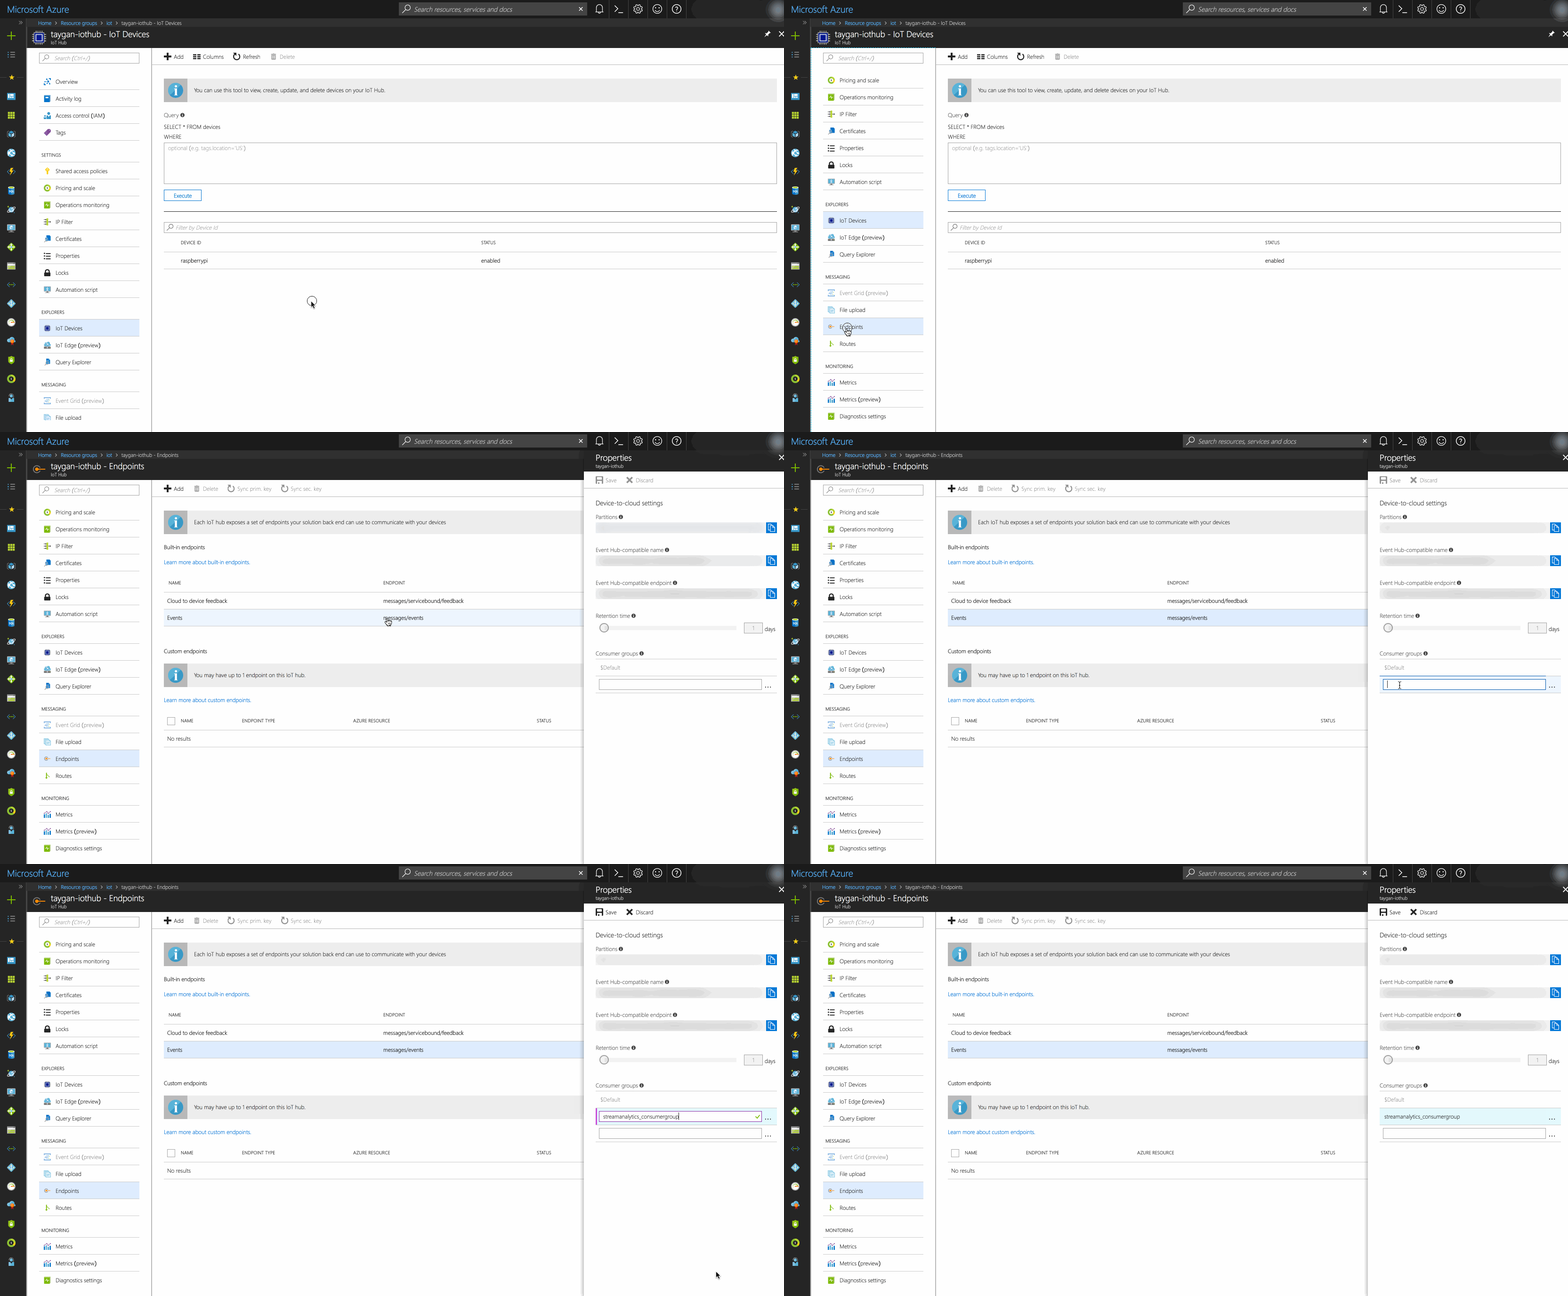
2. Create a Consumer Group
- Navigate to Endpoints within your IoT Hub.
- Click on the Events (messages/events) endpoint.
- Add a Consumer Group (e.g. streamanalytics_consumergroup).
- Click Save.
3. Setup Stream Analytics (Input and Output)
- Navigate to Inputs within your Stream Analytics resource.
- Click Add stream input > IoT Hub
- Provide an Input Alias (e.g. iothubinput).
- Select the Consumer Group (streamanalytics_consumergroup).
- Click Save.
- Navigate to Outputs.
- Click Add > Power BI.
- Provide an Output Alias (e.g. powerbioutput).
- Provider a Dataset Name (e.g. temperatureDataset).
- Provide a Table Name (e.g. temperatureTable).
- Click Authorize.
- Click Save.
- Click on Query to confirm both Input and Output have been configured correctly.
4. Stream Sensor Data to IoT Hub from a Raspberry Pi
If you haven't done so already, I highly recommend running through How to Build a Raspberry Pi Temperature Sensor as this step assumes the circuit and required Raspberry Pi configuration is complete and ready to go.
- Upload the Python script below onto your Raspberry Pi (e.g. rpi_temp_sensor.py).
- Update the following variables:
- SENSOR_DEVICE_ID (refer to previous post on how to get the ID of your Temperature sensor).
- URI (e.g. your_iot_hub.azure-devices.net).
- KEY (IoT Hub > Shared Access Policies > iothubowner > Copy & Paste the Primary Key).
- IOT_DEVICE_ID (the ID of the registered IoT device within IoT Hub).
- Start running the script from the command line (e.g. python rpi_temp_sensor.py).
- If successful, you should see the temperature readings being printed to the console. Messages are now sent to IoT Hub :)
Note:
- If you are running Raspbian, pip will need to be installed (sudo apt-get install python-pip).
- The code below has a dependency on the requests library (sudo pip install requests).
- Messages are being sent to IoT Hub via the REST API.
from base64 import b64encode, b64decode
from hashlib import sha256
from urllib import quote_plus, urlencode
from hmac import HMAC
import requests
import json
import os
import time

# Temperature Sensor
BASE_DIR = '/sys/bus/w1/devices/'
SENSOR_DEVICE_ID = 'YOUR_DEVICE_ID'
DEVICE_FILE = BASE_DIR + SENSOR_DEVICE_ID + '/w1_slave'

# Azure IoT Hub
URI = 'YOUR_IOT_HUB_NAME.azure-devices.net'
KEY = 'YOUR_IOT_HUB_PRIMARY_KEY'
IOT_DEVICE_ID = 'YOUR_REGISTED_IOT_DEVICE_ID'
POLICY = 'iothubowner'

def generate_sas_token():
    expiry=3600
    ttl = time.time() + expiry
    sign_key = "%s\n%d" % ((quote_plus(URI)), int(ttl))
    signature = b64encode(HMAC(b64decode(KEY), sign_key, sha256).digest())

    rawtoken = {
        'sr' :  URI,
        'sig': signature,
        'se' : str(int(ttl))
    }

    rawtoken['skn'] = POLICY

    return 'SharedAccessSignature ' + urlencode(rawtoken)

def read_temp_raw():
    f = open(DEVICE_FILE, 'r')
    lines = f.readlines()
    f.close()
    return lines

def read_temp():
    lines = read_temp_raw()
    while lines[0].strip()[-3:] != 'YES':
        time.sleep(0.2)
        lines = read_temp_raw()
    equals_pos = lines[1].find('t=')
    if equals_pos != -1:
        temp_string = lines[1][equals_pos+2:]
        temp_c = float(temp_string) / 1000.0
        return temp_c

def send_message(token, message):
	url = 'https://{0}/devices/{1}/messages/events?api-version=2016-11-14'.format(URI, IOT_DEVICE_ID)
    headers = {
        "Content-Type": "application/json",
        "Authorization": token
    }
    data = json.dumps(message)
    print data
    response = requests.post(url, data=data, headers=headers)

if __name__ == '__main__':
    # 1. Enable Temperature Sensor
    os.system('modprobe w1-gpio')
    os.system('modprobe w1-therm')

    # 2. Generate SAS Token
    token = generate_sas_token()

    # 3. Send Temperature to IoT Hub
    while True:
        temp = read_temp()
        message = { "temp": str(temp) }
        send_message(token, message)
        time.sleep(1)
5. Stream Analytics SQL
- Navigate to Query within Stream Analytics.
- Copy and paste the SQL below into your Stream Analytics query window.
- Click on the ellipsis next to your IoT Hub input and click Sample data from input.
- Set duration to 1 minute and click OK.
- Once the sample data has returned, click Test.
- Click Save.
- Click Overview.
- Click Start and then click Start once more.
SELECT
    CAST(iothub.EnqueuedTime AS datetime) AS event_date,
    CAST(temp AS float) AS temp
INTO
    powerbioutput
FROM
    iothubinput
5. Power BI
- Log on to Power BI.
- Create a new Dashboard (My Workspace > Create > Dashbaord).
- Add two tiles.
Tile #1: Card
- Click Add tile.
- Click Custom Streaming Data.
- Click Next.
- Select the temperatureDataset and click Next.
- Populate the properties.
- Visualization Type: Card
- Fields: temp
- Decimal Places: 2
- Title: Temperature (Celsius)
Tile #2: Line Chart
- Click Add tile.
- Click Custom Streaming Data.
- Click Next.
- Select the temperatureDataset and click Next.
- Populate the properties.
- Visualization Type: Line chart
- Axis: event_date
- Values: temp
- Time window: 1 minute
- Title: Temperature (Celsius)


